Monday, February 27, 2012
Tuesday, February 21, 2012
Monday, February 20, 2012
Tuesday, February 14, 2012
Rocinante Modifications
Source: http://tigertriple.com/forum/viewtopic.php?t=7023&postdays=0&postorder=asc&start=20
10% KTM, 80% Triumph and 10% other stuff
The main sources of weight reduction on Rocinante are:
1 - Replacing the exhaust, Norman Hyde and made for the same year Triumph Sprint, saves 9 kg and lower the centre of gravity a lot. It weighs only 5 kg and sounds very nice without beeing to loud. The only modification I did was to bend it say 15-20 degrees upwards behind the foot peg
2 - Removing farkles, Corbin seat and engine guards, at least 12-14 kg saved.
3 - Cutting of the tail end and replacing it with a 2003 KTM 660 SMC aluminum sub frame. I kept the bend of the original sub frame and cut off everything behind it, then cut off the KTM sub frame legs an laid it on top. This doesn't save as much weight as replacing the whole sub frame, but it will be stronger than the relatively thin KTM aluminum frame, and not least, a hell of a lot easier to do. I did it myself using mainly a hack saw and I'm not a mechanic. I don't how much weight I saved, but it wasn't more than maybe 3-5 kg. Better riding geometry was the most important goal. Eh, and looks... front fender is from a 2003 KTM 660 SMC, as is the rear sub frame and seat.
4 - Removed original luggage rack. I am waiting for a light weight rack from SW-Motech. Saved a few kg as well.
These four steps have brought the weight down to about 220-225 kg, but it subjectively feels lighter to me because the centre of gravity is so much lower. Much of the reduced weight in the sub frame, seat and pipes were placed high up.
 A lot of work remains, because at the moment it definitely is a prototype.
- The seat still needs to fit better in the front
- Paint. The whole bike will get new paint this winter, which includes a lot of work on the plastic. I believe there´s a spot down on the left side which hasn´t got a scratch.
- Engine covers need a paint job
- Cylinder head will be replaced (nothing to do with the rebuild though)
- Rear wheel to 18 inches, 17 at current
- Lower footpegs further, 1 or 2 cm. I´m almost two meters tall.
- Replace the original instrument with a Sixo all-in-one instrument from Motobau. This includes a lot of goodies. Check their website.
- Make a new aluminum bracket for the gps
- I might add a couple of lights up front to increase daytime visibility. After the crash this summer that seems sensible.
- Plastic side panels under the saddle need to be either made to fit better or custom made.
10% KTM, 80% Triumph and 10% other stuff
The main sources of weight reduction on Rocinante are:
1 - Replacing the exhaust, Norman Hyde and made for the same year Triumph Sprint, saves 9 kg and lower the centre of gravity a lot. It weighs only 5 kg and sounds very nice without beeing to loud. The only modification I did was to bend it say 15-20 degrees upwards behind the foot peg
2 - Removing farkles, Corbin seat and engine guards, at least 12-14 kg saved.
3 - Cutting of the tail end and replacing it with a 2003 KTM 660 SMC aluminum sub frame. I kept the bend of the original sub frame and cut off everything behind it, then cut off the KTM sub frame legs an laid it on top. This doesn't save as much weight as replacing the whole sub frame, but it will be stronger than the relatively thin KTM aluminum frame, and not least, a hell of a lot easier to do. I did it myself using mainly a hack saw and I'm not a mechanic. I don't how much weight I saved, but it wasn't more than maybe 3-5 kg. Better riding geometry was the most important goal. Eh, and looks... front fender is from a 2003 KTM 660 SMC, as is the rear sub frame and seat.
4 - Removed original luggage rack. I am waiting for a light weight rack from SW-Motech. Saved a few kg as well.
These four steps have brought the weight down to about 220-225 kg, but it subjectively feels lighter to me because the centre of gravity is so much lower. Much of the reduced weight in the sub frame, seat and pipes were placed high up.

- The seat still needs to fit better in the front
- Paint. The whole bike will get new paint this winter, which includes a lot of work on the plastic. I believe there´s a spot down on the left side which hasn´t got a scratch.
- Engine covers need a paint job
- Cylinder head will be replaced (nothing to do with the rebuild though)
- Rear wheel to 18 inches, 17 at current
- Lower footpegs further, 1 or 2 cm. I´m almost two meters tall.
- Replace the original instrument with a Sixo all-in-one instrument from Motobau. This includes a lot of goodies. Check their website.
- Make a new aluminum bracket for the gps
- I might add a couple of lights up front to increase daytime visibility. After the crash this summer that seems sensible.
- Plastic side panels under the saddle need to be either made to fit better or custom made.
Monday, February 13, 2012
MCN £1500 Adventure Bike Challenge
Three MCN staffers have bought and prepared three classic adventure bikes to find out if you can experience the thrills and spills of the great desert rally monster trailies on a budget.
Heidenau K60 Scout Tires, A Review On A Big Bike
Review and photographs by: Matthew Fehrmann, for www.cjdesignsllc.com
Let me start this review off with how impressed we are with the general performance of the Heidenau K60 Scout tire. What I hope to do is provide a good review including a collection of photos to share as they wore through our trip. Another important point I will attempt to make is the mix of conditions we put them through, the weight of our bikes, and the milage they carried us down the road. These are great tires and I will spoon on another set in the very near future.
The bikes we are riding are all 2006 KTM 950 Adventures.

Some of the specs to consider about our bikes, they are fully loaded for camping on the 2+ months and 20,000 miles we are spending on the road, we all have upgraded fuel tanks holding around 12 gallons each, and the riders weights range from 135lbs to 275lbs without gear. The rear Heidenau 150/80-18 is mounted on the stock adventure rim which is 4.25in wide, The front is 90/90-21 mounted on a 1.6in wide dirt bike rim either a DID Dirtstar Strong or Excel A60. Regardless of terrain we ran these at street air pressures, remember we need a compromise on milage and performance after all we are largely self funded in our testing, so the rear we ran at 36psi and the front at 34psi.
Some samples of the brand new Heidenau K60 Scouts mounted up and ready to roll.


After burning up some pavement to put some milage under our belt we found the tires holding up great, they roll smooth on the road, hold corners very well, and are predictable on the pavement regardless of speed or lean angle. There is plenty of side lug to start dragging hard parts on even the tallest of bikes so if you are into those sorts of things these tires will not disappoint.
We are about 2500 miles in for these photos and are almost at the ware bar in the center of the tire. once reaching this bar the added surface area should provide us an even longer life and that is exactly what we found as we continued to rack up the miles.


We ran this set to 7162 miles before pulling them off and if we did not already have a tire drop in Fairbanks, AK we could have easily ran these another 1000-2000 miles as long as the roads or trails were not too muddy or sloppy. We took them through a huge selection of terrain including but not limited to, highway, back roads, river rocks, hard pack dirt, gravel, and mud on the Haul Road to Deadhorse, in fact we chose to run these all the way to Deadhorse and back after stashing our dirt set since they were still so preforming so well. The high milage and traction was outstanding and for a 50 / 50 tire this is the set to run in my opinion.
The tires the day we pulled them off after 7162 miles.
Ardie’s Set (275lbs rider)


Craig’s Set (190lbs rider)


Matthew’s Set (135lbs rider)


Some notes about the front tire and it’s design, we did start to see some cupping near the end of our time running it but it wore like iron and stuck to the pavement and hard pack without much issue. This is a hard tire to run in the mud and the slippery ruts but once you figure out that you will end up in the low part of the rut it becomes a predictable and truly ridable tire through all but the deepest of mud and slop. For our use this tire ran the miles as intended on a dual sport ride, and the total milage shocked us on fully loaded bikes. The Front K60 Scout we would classify as a 50% on road 50% off road tire through it’s entire serviceable life.
The rear K60 Scout hooked up on almost everything we could throw at it and is a better tire off road than the stock tire with no compromises on the street. I’m totally sold on running this tire through almost anything dual sport rides could bring you and we all agree the rear tire is a good 65% off road 35% on road tire until about 4000 miles then it’s a 50% / 50% tire through the end.
Would we buy this set again for a trip like this? Yes no hesitation.
Milwaukee to Fairbanks in 7162 miles.
Motorcycle Tire Air Pump
webBikeworld Review
Long time visitors to webBikeWorld know that we've been hunting for the perfect motorcycle tire air pump for some time. The requirements are for the pump to be small, light, reliable, easy to stow and easy to use.
An air pump of some type is a necessity on a long-distance motorcycle tour. Besides the frightening thought of a puncture on, say, a dark and stormy night (let's hope you have radial tires that will take a simple plug), a multi-day tour means daily tire pressure checks. So our ideal pump would be able to fit in an easily accessible location, such as the top pocket of a tank bag or under the seat.
Since motorcycle tire air pressure is so crucial to the safe operation of the bike, a tire air pump is a "must have" tool. Every motorcyclist needs an air pump or a compressor in the garage, and there's no reason why a single pump couldn't work for everyday use also. And by the way, don't forget the air pressure gauge!
We recently conducted a review of a couple of small pumps, but we were less than thrilled at their performance for use with motorcycles. Most of the small hand-operated air pumps are designed for bicycle tires, which need high pressure and low volume. The valve stem on a bicycle tire is much more accessible than the valve stem on a motorcycle tire, mostly due to the motorcycle's disk brakes and heftier rim dimensions.
We were intrigued by the tiny Crank Brothers Power Pump (described in our previous review); it is incredibly small and lightweight, which would be ideal for storing in a tank bag or even a pocket. Unfortunately, we just couldn't get it to work on any type of tire, which is puzzling.
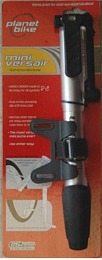 The folks at Planet Bike read the review and suggested we
try their "Mini Versair" pump. The Mini Versair is about 30 cm (~11-7/8") long
and weighs 210 grams (7-3/8 oz.) on the webBikeWorld scales. That makes it
bigger than the micro-sized Crank Brothers Power Pump, but still small enough to
fit in a small tank bag like the tiny Marsee Rocket Pocket (wBW review).
The folks at Planet Bike read the review and suggested we
try their "Mini Versair" pump. The Mini Versair is about 30 cm (~11-7/8") long
and weighs 210 grams (7-3/8 oz.) on the webBikeWorld scales. That makes it
bigger than the micro-sized Crank Brothers Power Pump, but still small enough to
fit in a small tank bag like the tiny Marsee Rocket Pocket (wBW review).
The Mini Versair even fits under the seat of a couple of different motorcycles. It comes with a plastic holder that's designed to fit on a bicycle frame, and there's a possibility that the holder could be adapted to fit on a motorcycle's frame with a little bit of creative engineering.
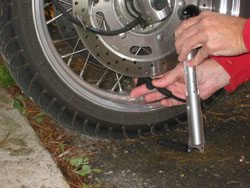
The Mini Versair can actually be used as a miniature floor pump. One end of the pump body has a foot that swings down and acts as a base for the pump. The operator can then step on the base to hold the pump in a vertical position. This is a cool feature, but we found that it works better for bicycle tires with their much smaller rims, because the hose isn't long enough to stand the pump on the ground and reach up on to the motorcycle tire valve stem, which is a much longer reach due to the size of the rim.
But the pump can still be used as a hand pump. The valve stem on the Mini Versair is attached to a short length of air hose that retracts into the body of the pump. It can be pulled out from the body and rotated 360 degrees perpendicular to the pump, which adds a lot of versatility to squeeze it into a tight location.
We found that the pump worked best when we rotated the motorcycle tire until the valve stem was 90 degrees from vertical and pointing towards the front. The pump handle on the Mini Versair folds outward and has a softer rubber-like coating. It's shape fits the hand, making it easy to work the pump. Planet Bike claims that the pump's "unisex" design makes it easy to use for both male and female riders.
The Mini Versair will fit both Schrader and Presta valves by flipping over an adapter in the tip of the pump's valve stem. Since all motorcycles use Schrader valves, this is a one-time adjustment. The valve adapters on most of these smaller tire air pumps is a very tight fit on the motorcycle's valve stem during the first several uses. They seem to go on tight and are sometimes very hard to remove until they get broken in. Rotating the pump's adapter in an anti-clockwise direction as it's pulled off the tire valve stem sometimes helps. But after about a dozen or so uses, they seem to loosen up and are easier to insert and remove.
The Mini Versair has a small tab on one side of the valve adapter that is rotated 90 degrees to lock it on to the tire valve stem. It took about 8 pumps to add one PSI of air to a 110/80-18 motorcycle tire inflated to 30 PSI. It works smoothly and efficiently (which isn't always the case with small pumps) and it's about all you can ask for in a miniature hand air pump.
The valve adapter is about 50 mm (2") long, which could be a problem on a motorcycle tire with a very tight space between the outer diameter of the disk brake rotor and the tire valve stem. This isn't a concern on a bicycle tire, but you may want to check the clearance on your motorcycle's tire. Lack of clearance is one of the main problems we've found with any type of tire air pump. It can be difficult to insert and remove the air pump's valve adapter from the motorcycle tire valve stem without some knuckle-busting.
The Mini Versair is similar in size to the Blackburn Mammoth Comp we reviewed previously, but it has a dual-action pumping system that fills the tire about 20% faster. We like dual-action pumps and this is definitely a feature to look for. After all, why waste any hand movement! You can tell if a pump is dual-action by holding a finger over the business end of the adapter whilst pumping in and out. If you feel air coming out the end during both strokes, it's a dual-action pump.
It's hard to tell in these photos, but the body of the Mini Versair is entirely covered in a thick, clear plastic tube. This provides some added strength and also prevents damage to the aluminum pump body. Overall, the pump is a very nice piece of equipment that is made to Planet Bike's specifications with a very high level of quality. If someone like BMW made an air pump, this would be it!
The Mini Versair carries a limited lifetime warranty on defects in workmanship and materials. It's interesting to note that Planet Bike donates 25% of its profits to bicycle advocacy projects. They've donated over $200,000.00 since 1997! Check out their website for more information.
Conclusion
The Planet Bike Mini Versair pump is the new champ and comes as anything to our ideal motorcycle tire air pump. It's light weight, easy to use, and works very well with it's dual-action pumping system. The plastic parts seem to be of very high quality and it's got a unique design with it's fold out valve adapter. The flexibility of the adapter makes it relatively easy to fit on a motorcycle tire valve stem.

Here are the instructions for making this motorcycle tire air pump:
If you really get carried away, you can strip this pump down to the bare essentials by cutting down the air hose and electrical cable to minimum lengths.
I elected to leave my cables at full length; I figure that the whole assembly is pretty small, and you never know when you may need the extra length to pump a buddy's tire or to connect to a car's cigarette lighter.
Plus, I planned on using this in the garage, and leaving the length as is makes it easier to get to my motorcycles.
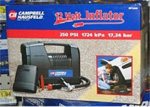
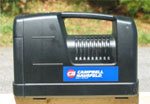
You should be able to find this Campbell-Hausfeld RP1200 (or similar) air pump at your local Wal-Mart (Photo 1). I found mine just by chance for $9.96. A definite bargain!
My comment is that in your instructions, you say to remove the three screws when there is actually a fourth screw hiding under the pop off cover. Using a knife to slice the stickers along the seams allows the case to easily separate". Thanks J.M.!
Long time visitors to webBikeWorld know that we've been hunting for the perfect motorcycle tire air pump for some time. The requirements are for the pump to be small, light, reliable, easy to stow and easy to use.
An air pump of some type is a necessity on a long-distance motorcycle tour. Besides the frightening thought of a puncture on, say, a dark and stormy night (let's hope you have radial tires that will take a simple plug), a multi-day tour means daily tire pressure checks. So our ideal pump would be able to fit in an easily accessible location, such as the top pocket of a tank bag or under the seat.
Since motorcycle tire air pressure is so crucial to the safe operation of the bike, a tire air pump is a "must have" tool. Every motorcyclist needs an air pump or a compressor in the garage, and there's no reason why a single pump couldn't work for everyday use also. And by the way, don't forget the air pressure gauge!
We recently conducted a review of a couple of small pumps, but we were less than thrilled at their performance for use with motorcycles. Most of the small hand-operated air pumps are designed for bicycle tires, which need high pressure and low volume. The valve stem on a bicycle tire is much more accessible than the valve stem on a motorcycle tire, mostly due to the motorcycle's disk brakes and heftier rim dimensions.
We were intrigued by the tiny Crank Brothers Power Pump (described in our previous review); it is incredibly small and lightweight, which would be ideal for storing in a tank bag or even a pocket. Unfortunately, we just couldn't get it to work on any type of tire, which is puzzling.
The folks at Planet Bike read the review and suggested we
try their "Mini Versair" pump. The Mini Versair is about 30 cm (~11-7/8") long
and weighs 210 grams (7-3/8 oz.) on the webBikeWorld scales. That makes it
bigger than the micro-sized Crank Brothers Power Pump, but still small enough to
fit in a small tank bag like the tiny Marsee Rocket Pocket (wBW review). The Mini Versair even fits under the seat of a couple of different motorcycles. It comes with a plastic holder that's designed to fit on a bicycle frame, and there's a possibility that the holder could be adapted to fit on a motorcycle's frame with a little bit of creative engineering.
The Mini Versair can actually be used as a miniature floor pump. One end of the pump body has a foot that swings down and acts as a base for the pump. The operator can then step on the base to hold the pump in a vertical position. This is a cool feature, but we found that it works better for bicycle tires with their much smaller rims, because the hose isn't long enough to stand the pump on the ground and reach up on to the motorcycle tire valve stem, which is a much longer reach due to the size of the rim.
But the pump can still be used as a hand pump. The valve stem on the Mini Versair is attached to a short length of air hose that retracts into the body of the pump. It can be pulled out from the body and rotated 360 degrees perpendicular to the pump, which adds a lot of versatility to squeeze it into a tight location.
We found that the pump worked best when we rotated the motorcycle tire until the valve stem was 90 degrees from vertical and pointing towards the front. The pump handle on the Mini Versair folds outward and has a softer rubber-like coating. It's shape fits the hand, making it easy to work the pump. Planet Bike claims that the pump's "unisex" design makes it easy to use for both male and female riders.
The Mini Versair will fit both Schrader and Presta valves by flipping over an adapter in the tip of the pump's valve stem. Since all motorcycles use Schrader valves, this is a one-time adjustment. The valve adapters on most of these smaller tire air pumps is a very tight fit on the motorcycle's valve stem during the first several uses. They seem to go on tight and are sometimes very hard to remove until they get broken in. Rotating the pump's adapter in an anti-clockwise direction as it's pulled off the tire valve stem sometimes helps. But after about a dozen or so uses, they seem to loosen up and are easier to insert and remove.
The Mini Versair has a small tab on one side of the valve adapter that is rotated 90 degrees to lock it on to the tire valve stem. It took about 8 pumps to add one PSI of air to a 110/80-18 motorcycle tire inflated to 30 PSI. It works smoothly and efficiently (which isn't always the case with small pumps) and it's about all you can ask for in a miniature hand air pump.
The valve adapter is about 50 mm (2") long, which could be a problem on a motorcycle tire with a very tight space between the outer diameter of the disk brake rotor and the tire valve stem. This isn't a concern on a bicycle tire, but you may want to check the clearance on your motorcycle's tire. Lack of clearance is one of the main problems we've found with any type of tire air pump. It can be difficult to insert and remove the air pump's valve adapter from the motorcycle tire valve stem without some knuckle-busting.
The Mini Versair is similar in size to the Blackburn Mammoth Comp we reviewed previously, but it has a dual-action pumping system that fills the tire about 20% faster. We like dual-action pumps and this is definitely a feature to look for. After all, why waste any hand movement! You can tell if a pump is dual-action by holding a finger over the business end of the adapter whilst pumping in and out. If you feel air coming out the end during both strokes, it's a dual-action pump.
It's hard to tell in these photos, but the body of the Mini Versair is entirely covered in a thick, clear plastic tube. This provides some added strength and also prevents damage to the aluminum pump body. Overall, the pump is a very nice piece of equipment that is made to Planet Bike's specifications with a very high level of quality. If someone like BMW made an air pump, this would be it!
The Mini Versair carries a limited lifetime warranty on defects in workmanship and materials. It's interesting to note that Planet Bike donates 25% of its profits to bicycle advocacy projects. They've donated over $200,000.00 since 1997! Check out their website for more information.
Conclusion
The Planet Bike Mini Versair pump is the new champ and comes as anything to our ideal motorcycle tire air pump. It's light weight, easy to use, and works very well with it's dual-action pumping system. The plastic parts seem to be of very high quality and it's got a unique design with it's fold out valve adapter. The flexibility of the adapter makes it relatively easy to fit on a motorcycle tire valve stem.
 |
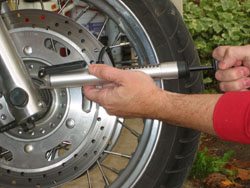 |
| The flexible and retractable hose on the Mini Versair isn't quite long enough to allow the use of the floor mount orientation... | ...but the short length of hose gives the Mini Versair added flexibility for use as a hand pump and with the motorcycle tire in various orientations. |
Motorcycle Tire Air Pump
Make your own!
by Rick K. for webBikeWorld.com
This air pump can be used for motorcycle tires -- it's easy to
carry and can be powered from a motorcycle battery or other 12-volt battery.
I was on the lookout for a cheap, lightweight and effective
motorcycle tire air pump.
This would be something to carry in a saddlebag or tank bag in
case of a flat, or to use at home for inflating motorcycle tires.
Motorcycle tires should always be checked before each ride to make
sure they are inflated correctly, so it pays to have a simple air pump handy.
I have a flat repair kit, that I usually only carry on long trips,
but it won't do much good if I can't get the tire inflated.
After looking around at hand pumps, cans of tire inflator gas, CO2 cartridges, etc., I happened to read a post on a motorcycle email list that discussed converting an air pump.
After looking around at hand pumps, cans of tire inflator gas, CO2 cartridges, etc., I happened to read a post on a motorcycle email list that discussed converting an air pump.
It said that if you can find a small, inexpensive Campbell
Hausfeld air compressor, you can rip the guts out and make a small and
lightweight pump that can be used for motorcycle tires.
I'm not the only person to think of this -- there are other
websites out there with similar information and some photos. But I was
definitely intrigued, so I had to try it for myself, and I figured I'd post this
information for others to see.
It's very easy to turn one of these small air compressors into an
even smaller carry-on motorcycle tire air pump.
 |
|
Photo 1 (above).
|
 |
 |
|
Photo 3 (above).
|
 |
|
Photo 4 (above).
|
 |
|
Photo 5 (above).
|
If you really get carried away, you can strip this pump down to the bare essentials by cutting down the air hose and electrical cable to minimum lengths.
I elected to leave my cables at full length; I figure that the whole assembly is pretty small, and you never know when you may need the extra length to pump a buddy's tire or to connect to a car's cigarette lighter.
Plus, I planned on using this in the garage, and leaving the length as is makes it easier to get to my motorcycles.
You should be able to find this Campbell-Hausfeld RP1200 (or similar) air pump at your local Wal-Mart (Photo 1). I found mine just by chance for $9.96. A definite bargain!
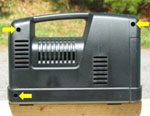
Take out the 3 screws at the locations shown in Photo 3. Split
the case apart -- it may take some force with a screwdriver, but there's really
nothing in there that can get hurt. You'll hear some serious crunching, but
this part is trash anyway.
Note: wBW Visitor "J.M." wrote to tell me why I probably had to use a
screwdriver to force it apart -- a fourth screw! He writes: "Yes, I bought one
of the Campbell-Hausfeld compressors at Wal-Mart. This is really a nice small
package. My comment is that in your instructions, you say to remove the three screws when there is actually a fourth screw hiding under the pop off cover. Using a knife to slice the stickers along the seams allows the case to easily separate". Thanks J.M.!
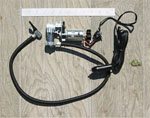
Rip out the guts! Here's what you're left with, shown in Photo 4
(minus the clump of grass on the right-hand side of the photo!); the only
difference is I used some electrical tape to attach the on/off switch to the
cable. That's a 12-inch scale at the top of the photo.
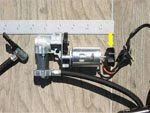
I didn't cut the electrical cable and the air hose to make them
shorter, although you can do this if you want an even more compact assembly.
The arrow in Photo 5 points to the fan that keeps the pump cool
when it's in the case. I used a hacksaw to cut the shaft to remove this piece;
I figured I wouldn't need it, since the case is history.
Be careful if you do this -- the shaft that the fan runs on is
made of some pretty tough metal, and you don't want to bend the internal part of
the shaft.
Thursday, February 9, 2012
Horizons Unlimited - Acheivable Dream
What turns you on to Motorcycle travel?
Intro
Gear Up!
On the Road!
Tire Changing
Hill Climbing 101
Steep Hill Climbs
Hill Climbs
Zig Zag Ascent
Two Stage Hill Climb
Two Stage Hill Climb with Ledge
Vertical Lip Scale
Rich Lafferty - Riding Tips
Gripping with your legs
Leg out for a turn
Looking Ahead
Snow Riding
Momentum
Lever Position
Proper Sitting Position
Proper Standing Position
Proper Arm Position
Stefan Everts - Bike Set-up
Handlebars
Clutch Lever
Front Brake
Rear Brake
Gear Shifter
Suspension
Body Positions
Dirt Riding Techniques
Bike Setup
Weight Distribution
Controls Setup
Handlebar position
Lever position
Body Language
Braking
Cornering
Flat Corners
Off Camber Turn
Berms
Ruts
Long, Deep, Straight Ruts
Tight Turn Pivot
Log Hopping
Log Crossing Speed
Jumping a Log
Scaling a Log by Pivoting
Switchbacks
Switchback Pivot
Ditch Gaps
Deep Sand
Obstacle technique
Tyre De-weight
Seat Bounce
Enduro Seat Bounce
Drop Off
Jap Zap
Slab and Log
Steep Ledge Kickback
Rock and Roll
Rock Hopping
Two Step ledge hop
500 Shuffle
Jumping
Water Crossing
"How to drown and un-drown a dirt bike" by Doc Wong
Step One - The Plunge
A) Have a conversation with a "trusted" friend that will assure you he made it last week when the water was this high too. Look at the crossing for your line through. Assess that you have only a 20% chance that you can ride on top of those moss-covered boulders and keep from sinking into 4-feet-deep water.
B) Make sure you do this early in the day. Who knows how long you'll be here!
C) Take the plunge. Stay on the pegs, feather the clutch, don't gas it too hard over those moss-covered boulders.
D) Know that only an insane person would attempt to do this, and do it anyway.
Step Two - Sunk

Oh, I know: to un-drown a dirt bike, first you have to drown it!
Darn! I guess I should have known that I was in trouble when the water started going over my front fender.
Ooops...aaa...by the way, having the "right" attitude helps.
And...aaa....yes, this was all planned. I was just demonstrating what not to do! Yeah, that's right.
Step Three - Relax
Hey, you're sunk, you're wet, but the weather's nice and you were hot from all that "tough" riding anyway....right?
So, relax and accept your fate.
Not for long though! Your friends are about to take off--so get off your butt and get that bike started!
Step Four - The Fix
How to re-start the bike (for 2 strokes)
This procedure takes less than 30 minutes (once you've done it a few times ;-) )
1. Remove your seat, air filter and spark plug.
2. Flip the bike upside down and manually pump the kick starter by hand 52 times.
3. Stand the bike up on its rear wheel to drain the muffler and pump the kick starter 12 times.
4. Flip the bike back upside down and pump the kick starter 21 times.
5. Re-install a new and dry spark plug.
6. Remember to re-install the spark plug wire.
7. Start the bike ... and that's all there is to it!
8. Oh, yes: dry out the air cleaner and re-install along with the seat.
End of Step Four. Now, go riding--and this time don't be so stupid! Unless, of course, someone says he or she made it through the creek here.... What? You chicken?
Doc Wong Dirt Riding Tips
Dirt Riding Techniques

Compiled from the many experts that I've had the pleasure to ride with
including: Eric bir (AA #5 National Hare Scrambles rider, Bruce Rust, John
Haaker, John Delagnes and the guys from the "wild" Los Altos Dirt Bikers and
Gary Steed who got me hooked on the more technical, knarley, insane trails and
many more!
Topics:
- BODY POSITION - where to put your body, weight distribution, foot pegs, balance--sitting and standing
- HANDLE BAR CONTROL: input only not bal, hanging
- HOW TO BE LIGHT ON THE BIKE letting the bike do what it needs to do and you just guiding it.
- UP HILL techniques - The easy way and the hard way
- DOWN HILL techniques - Body position, braking and steering.
- TURNING in the dirt - use of the pegs to steer.
- ACCELERATING - use of stomach muscles not handlebars, light pressure on the bars - standing-use of knees to pinch tank
- Off CAMBER situations - peg weighting and steering
- HOW TO MAINTAIN TRACTION IN LOOSE, KNARLY NASTY PLACES:
SLIPPING that clutch - Do bikes have automatic transmissions?
DISCOVER "The magic of a two-stroke."
- Keeping that FOOT IN AND NOT OUT.
- BRAKING
- JUMPS
- DROP OFFS
- RUTS AND SINGLE TRACK TECHNIQUES
- ADVANCED: LOCKING THE FRONT WHEEL AND RIDING THE BIKE
- LINES
- BIG LOOSE HILLS
NOTES FROM MARCH 1997'S CLINIC WITH AA RIDER ERIC MASHBIR by some of the participants
There were three women in our group of 13. People ranged from those who'd only been dirtriding a few times to guys in full moto regalia hoping to improve their motocross skills. Ages were from about ten(?) to maybe 55. Bikes were mostly two-strokes, with three XR250's thrown in. There were two father/son duos, one son being about ten, on a Suzi minibike. The little guy did it all, including the jump into a river bed! (Dry).
Doc Wong made like a rabbit and disappeared up some steep hills when he got bored with practicing. Made it look easy.

I took written notes during the day. This is a summary for the other riders and those who did not attend if they are interested. In my opinion it was an A+ day. Eric didn't just ride around with the rest of us desperately trying to keep up, but taught the whole day. The format was based on addressing a set of dirt riding skills. First, Eric would explain how to and how not to. Then he would demonstrate with at least one demonstration per skill at high speed resulting in audible amazement from the collected students. We would each perform the skill and he would critique us individually. We assembled at Carnegie at 9:00 and started instructions a little before 10:00 finishing at 5:30.
Riding position and bike setup
We started with a demonstration of riding position using Eric's bike on a stand. The emphasis is on standing up. Eric stresses standing up in almost all situations. He sits in the apex of a turn but in any difficult terrain, stand up. Smooth roads, well, ok sit. Pivot point is the footpegs, legs are like extra shock absorbers, arms are like extra front forks, knees and elbows bent. Knees locked into the tank, head forward of your centerline and butt to the rear about an equal amount. Hip to shoulders are straight. You should be balanced fore and aft and side to side. Look ahead not at your front fender. You should be looking where you will have time to react. If your legs burn, lock your knees more to take some load off. Grip handle bars with index and/or middle finger covering your brake and clutch. Emphasis on keeping the brake lever covered for fast reaction; don't grip the bar with all four fingers. Don't grip the bar hard, the v from thumb to index finger on each side can maintain control most of the time. Obviously, more grip in bad ruts, etc. Try to keep wrists straight, not cocked up or down. My nemisis, covering the brake is new, I realize now that I am cocking my wrist up to reach it. If I lose my balance at all backward or even big bumps on cobbles I straighten my arm which uncocks my wrist which turns on the throttle which on a new ATK 600 is one hell of a burst forward which throws me more back which causes me to straighten more which causes more throttle which - aaarrrgggg!
Handle bar setup
This should facilitate standing up without comprimising sitting down. Most of us moved our bars up somewhat from where we had them. One way of judging is sighting directly from the side. The upward taper of the bar should be about parallel with the fork (works on Answer and ProTaper). The result is the actual grips are still basically level but the bar is a little forward and up. My Answer bar ended up on the -1 setting (its marked near the triple clamp.)
Levers
both should be slightly down. It's a compromise between standing and sitting - personal preference.
Shifter
Up about 1 to 1 1/2 inches from footpeg top. This is to keep your toe from going to low when up shifting and getting caught by a hard object and pulled under the peg - not pleasant. This will make you raise your foot slightly to downshift.
Rear brake
Even with the footpeg and not much play to engagement again to protect your foot. Do not put it higher than the footpeg so that you don't ride it and thus heat up and lose the rear brake.
Brake fluid
Its been said that Motul 300c is the best. Eric changes his brake fluid before every race.
Braking drill
Stopping comes from 70% front, 30% back; use both. Not using the rear brake will cause the bike to spin around as the back catches up with the front. Keep body position back so your arms can take the load; don't sit. We practiced this on a level spot accelerating to a cone and stopping before the next cone.
Turning drill
This was done in two stages; a series of tight turns and another drill with a sweeping turn. Again, in the same level area. Conditions were hardpan with loose stuff on top so slippery and not very good. Some points:
Don't brake in the corner, finish before it.
In Apex sit down, weight is forward on the bike.
OK to put your inside foot out and to the front; use it if you need it.
Sit on the outside (of the turn) of the bike. Weight on the outside footper. Bike leans in.
Pick a good line; outside, in to the apex and back out again.
In the higher speed sweeper, get the corner finished and the bike aimed where you want to go before turning on the gas; don't spin out sideways. Eric went through this one so fast it was hard to believe. When he got done he said he hit it just right; about as good as he could do - I agree.
Hill climb
This was a fairly easy hill without whoops; emphasis on technique and allowing all the riders to do it. Points:
Going up - body weight forward; don't sit but your butt is only a few inches off the seat; you are not standing way up in the air.
Maintain momentum, the main thing behind successful hill climbing. Get as much speed as possible before starting up.
Shift as you go up before you bog. If you start to bog you will not make it.
Throttle control - try not to spin the rear wheel; it will just lose traction.
Going down
Body weight back. Still standing up but butt is off the back of the bike. Arms are almost straight taking the load but don't totally lock your elbows.
Apply both front and back brake. The back brake stabilizes the bike on the way down. The front brake provides most of the braking power.
RUTS
Doc Wong led this one, and the intent was to encourage us to let the bikes' front wheel follow the rut. I couldn't get comfortable with this one.
Drop offs
Eric's demonstrations were sensational, he made it look so easy, and for the last hourray he showed us how to jump off a six foot drop. I was certain he was going to crash and die but he flew over the drop like it was a small bump. Luckily, we were assigned a much smaller "cliff", a one footer, which still scared the bejesus out of me.
In order to do thejump though, we had to wheelie just before lauching over the cliff. Several of us , me included, were wheelie challenged so Eric gave us a brief lesson. Though I had tried several times before on my ZX6, XT350 and lately the R1100GS I was never able to wheelie for the life of me. Needless to say I felt very diminished by it. A few tries after Eric's lesson I was pulling my front wheel like a charm, the man is a genius. Of course I attribute the success to my own abilities and not the KTM's torque.
Suddenly the one foot drop was no more a challenge and I was flying over the ledge. Well I'm only slightly exagerating here; since my wheelies are still not very well controlled, most of the time I just slid over the one foot drop. But hey I can wheelie now, so there. Eric demonstrated drops on a hill with a ledge caused by a cross path. This one really did get an audible gasp from the troops. Both going up and down that hill he was more in the air than on the ground. We practiced on the level with only a 1 foot drop so that if you blew the technique, no damage done.
The secret to drop offs is to do a small wheelie just before you get to it. You want to keep the front tire up when you land; preferably with the rear tire hitting slightly first. The more momentum you have the easier the landing; however, know what you are landing in and judge speed to fit the situation.
Bumps
Eric demonstrated a faster way to go over small bumps of a foot or two. Don't hit it with your front tire and jump. Instead, wheelie your front wheel over it letting the back wheel hit. This will put the bike right back down on the ground so you can accelerate out while your friend to the right is flying through the air.
Subscribe to:
Posts (Atom)